Hello Fellow Hams / Cary ARC members. This is Larry Schroeder, President of CARC.
We are a nice size club in Cary NC. We have members interested in different aspects of amateur radio.
We had a good year. But we would like more of our fellow hams in the Cary area to join us at our club meetings.
We had a number of great presentations:
• We discussed RFID.
• Had a presentation on POTA and did two activations in local parks.
• We also had a number of presentations on FT8 and other digital communications
• We also had a class on weather watching members could attend.
• We also plan to have presentations on TARPN, and other current topics of interest.
• We also set up for Field day in June.
• We have our own hamfest we call a Swapfest the third Saturday in July at Ritter Park, 301 W Lochmere Drive in Cary, NC.
We meet on the 4th Thursday of each month except for July, November and December at 731 PM at the White Plains Methodist church on Maynard Rd in Cary NC. All are welcome.
The current officers are Tom Schwarts Vice President, Chad Lyons Secretary, and Gary Bann Treasurer and myself as President.
The club has a holiday lunch or dinner the week after Thanksgiving on Saturday. All club members and spouses are invited.
Details will be sent well in advance.
Have a good day and I look forward to seeing you at our next meeting.
The International Morse Society sponsors America’s FISTS CW Club, whose purpose is to help Hams enjoy the feeling of being a real Ham Radio Operator. Ham Radio is fun, but when using CW, is really fun. Learn more about this great organization that welcomes “beginners” and offers everything a Ham needs to enjoy CW friends worldwide.
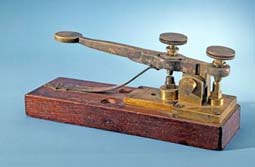
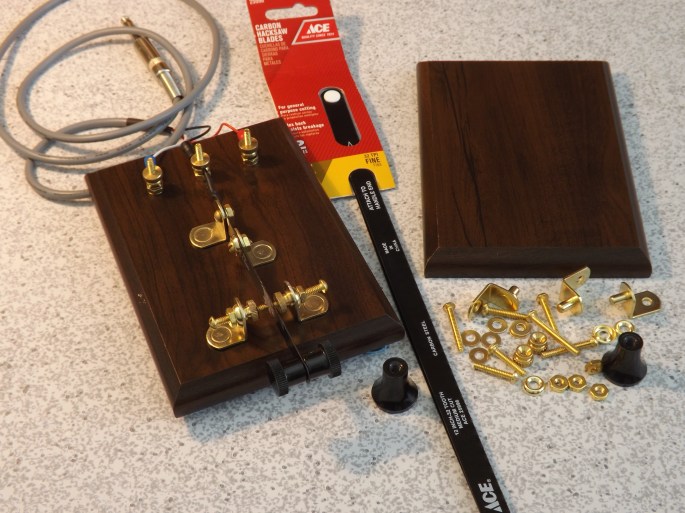
Remember Samuel Morse’s original telegraph key, made from custom machined parts. It was good enough to introduce the world to the telegraph signal that would become CW. But what if Sam could have had a neighborhood Ace Hardware store? Would have opted for a key made from nuts, bolts, screws and a hacksaw blade?
Take a look at the photos below to see Morse’s first key, and then compare that with an Ace Hardware “sideswiper” key that can be made by anyone.
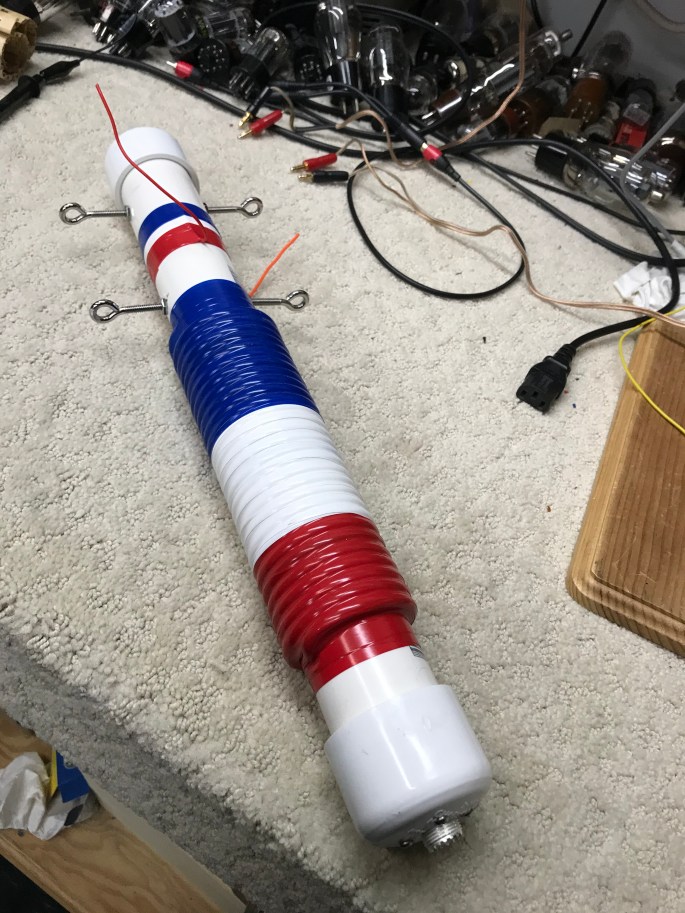
And if you are wondering what kind of antenna works well with the “Ace” special – a special choke and its accompanying 30m/17m dipole.
Every weekend, in cities and towns all across the country, ham radio operators gather on hilltops for a very special kind of contest–the Fox Hunt. A small, low power transmitter is hidden and the rest of the crew tries to find it. Sound simple? It can be very challenging and a whole lot of fun. The direction finding skills learned in this activity can be very valuable in locating a repeater jammer, or a lost hiker.
At our August CARC meeting we learned how our Club can get started joining the thousands of Hams who compete regularly in hunts for a “Fox” transmitter in their area that hones their skills at making direction finders and in using the “beams” to track down the elusive signals in urban and wooded areas.
We built a hand-held two meter yagi from a handful of pvc pipes, a few pipe clamps, and a yard or two of steel measuring tape!
The 2 Meter band tape measure beam antenna is a 3 element Yagi with about 7.2 db of forward gain. This lightweight antenna is perfect to use for fox hunts or as a portable directional antenna for public service events.
There are plenty of plans online to build your own tape measure antenna, but no good step by step video that takes you through the process. So with that, watch the video and go ahead and build your own tape measure yagi.
Parts List
1 25 foot 1 inch wide steel tape measure
1 10 foot piece of 3/4 inch Schedule 40 PVC Tube
2 3/4 inch PVC Cross connectors
2 3/4 inch PVC T connector
6 3/4 to 1 1/2 inch stainless Hose Clamps
1 5 inch piece of 14 ga wire
1 length of RG-58 cable, approx 6 foot
Solder and Flux
Electrical Tape
Tools
Soldering Iron
Tin Snips
Wire Cutter
Screw driver or nut driver
PVC cutter or fine tooth saw
Sand paper or Dremel tool with sanding disk
Ruler or tape measure
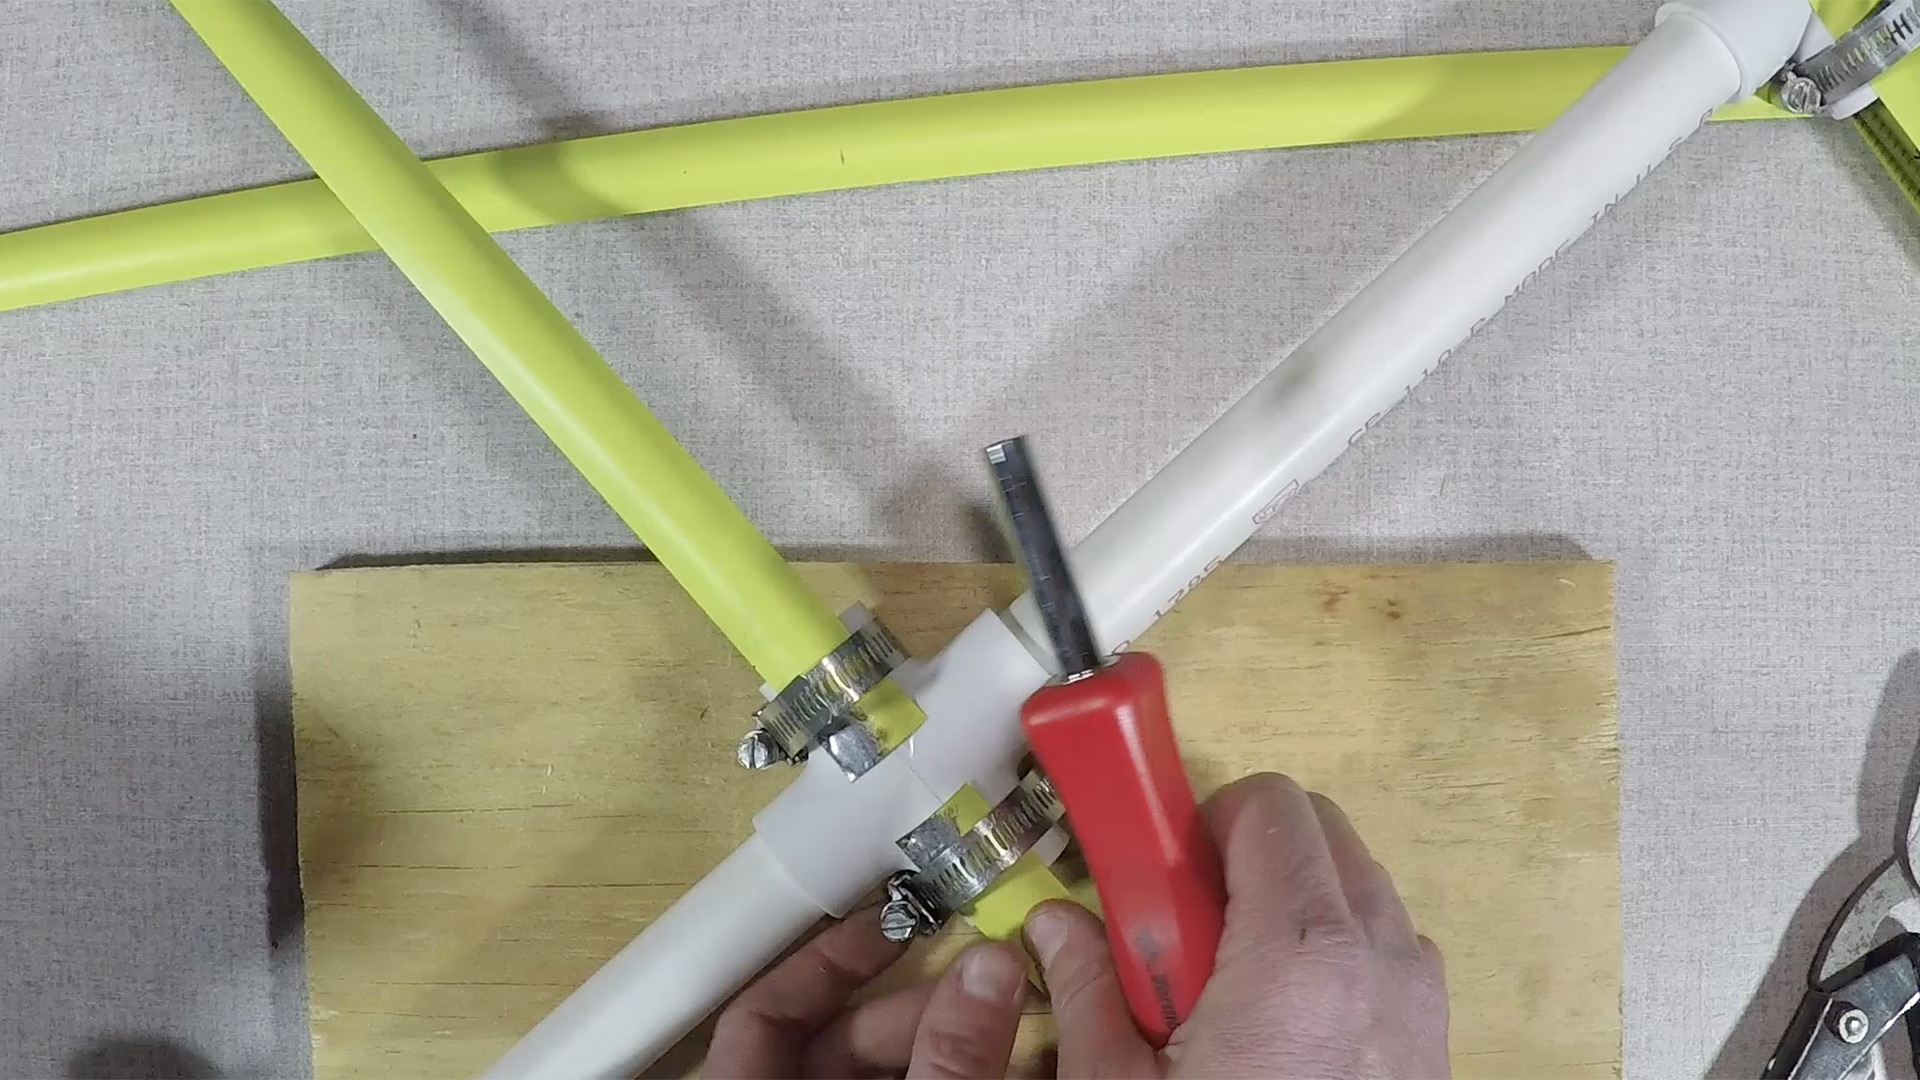
Step 1
Cut three pieces of PVC tubing. One piece will be 11 1/4 inches long and the second will be 6 7/8 inches long. These pieces will make up the support boom for the antenna. The third piece can be any length, it will be the handle for the antenna, so give yourself about a foot or foot and a half. Whatever is comfortable.
Fit the pieces of PVC tube together with the crosses and the T. You may PVC cement if you wish to make the connections permanent, otherwise dry fitting them will be fine. The distance between the first cross and the middle cross has to be 8 inches and the distance between the middle cross and and the T has to be 12 1/2 inches. These are measured from the center points of the connectors. Make adjustment if necessary.
Step 2
Cut the tape measure into four pieces. One piece will be 41 3/8 inch and the second will be 35 1/8 inch. These are the reflector and director elements for your yagi. The driven element is made up of two pieces, so cut two pieces that are 17 3/4 inches long.
Step 3
On the two driven element pieces, sand or grind away the paint from one corner. This is where we will solder the the coax and the hairpin match. Apply flux and use your soldering iron to tin this area. It’s easier to tin this area now before attaching the elements to the support boom.
Step 4
Assemble the director and reflector elements. Making sure they are centered, use the hose clamps to attach the elements to the T and Cross connectors.
Step 5
Assemble the driven elements. Using the hose clamps, attach each half of the driven elements to the Cross connector. There should be a one inch gap between the two pieces.
Step 6
Attach the hairpin match. Take your 5 inch piece of wire and strip 1/4 inch off each end. Bend the wire so it is in a U shape with a 3/4 inch gap. Solder this to the tinned ends of the driven element.
Step 7
Attach the coax. I’ve got a six foot length prepared piece of RG-58 coax where I put a BNC connector on one end and stripped the braid and center conductor on the other. You’ll solder these two ends to the driven element of the antenna. It doesn’t make a difference which end goes where. Now before you solder, you can drill a hole in your boom and thread the coax inside the pipe. Otherwise just use a couple of cable ties or electrical tape to secure the coax to the antenna.
With that, your antenna is complete. With these dimensions the antenna should be resonant at about 146.5 Mhz. If you are going to use this as a receive antenna for fox hunting, tuning isn’t critical, but if you plan to transmit with it, then you can check it with an antenna analyzer or power meter and make any small adjustments by varying the gap between two parts of the driven element.
“A great magnetic loop antenna, from inexpensive lumber and easily assembled parts, that cost less than $100.”
Live in a location with HOA restrictions? This is a great “stealth” antenna.
At the March 22 meetup Jim (W4VCF) and Jim (N4CAE) gave a presentation on magnetic loop antennas – detailing the components and construction techniques as well as the technical characteristics inherent to these antennas. The surprise conclusion of this session was a live over-the-air QSO using one of these homemade antennas to Herb who reported a good RST!